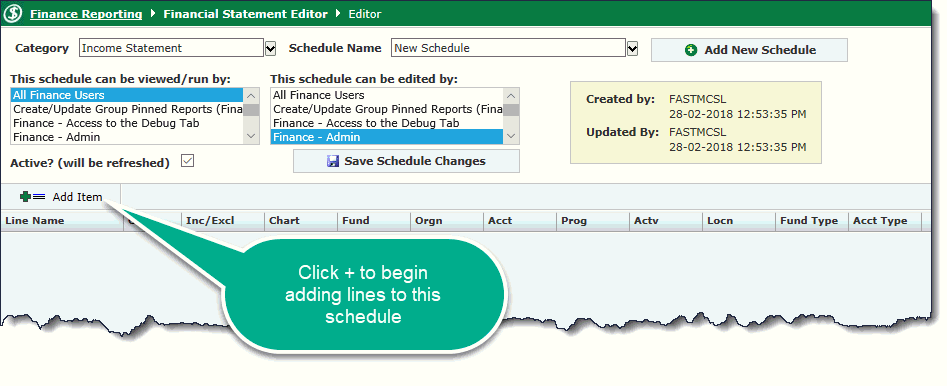
In the Financial Statement Editor, you add accounting lines and include or exclude specific codes to create the financial statement you want. You can also add a range of codes for your schedule, and after you are finished, you can build and view the schedule.
On the Financial Statements menu, click Financial Statement Editor.
Select a Category from the list:
Income Statement: Limits your report to Income Statement accounts.
Balance Sheet: Limits your report to Balance Sheet accounts.
Combined: The Combined Statement can include Income Statement and Balance Sheet accounts.
Click Add New Schedule:

Type the Schedule Name
You now must select the viewing/running and editing permissions.
From the view/run permissions list (This schedule can be viewed/run by), select the roles that can view and run the schedule.
From the edit permissions list (This schedule can be edited by), select the roles that can edit the schedule.
To include more than one group of end users, hold down your Shift or Ctrl key.
Click Save New Schedule.
By default the Schedule will be set to Active. This can later be switched to inactive if necessary.

To add lines to your schedule,
click  Add Item. Required
fields are marked with an asterisk.

Type the Line Name, for example Administrative Costs. TAB or click into the next field.
In the Order box, type a line number so similar lines are grouped together when you build the schedule.
For the Inc/Exc field, do one of the following:
Type E to exclude or I to include specific codes.
From the list, select Include or Exclude.
Type the Chart number or name.
In the accounting code text boxes, type the codes you want to include or exclude for the line. How to use the filtering features to add codes
If your institution has enabled the Multiplier column, you may include a Multiplier value. The default value is 1. This can be changed to -1 or set to a percentage such as 0.8. This function is disabled by default and can be enabled at your institution by contacting Customer Support.
Click one of the following:
 Save the line.
 Save and
add another line.
 Cancel
and discard the line.
 Copy the line.
Continue adding lines until you have finished your schedule.
When you are finished adding all items, Click on Rebuild & Run Schedule.

Rebuild & Run Schedule: Click to build the schedule.
Attach Additional Information: Click to attach documentation.
Exporting a Schedule : Click to export the schedule to a file.
Copy Schedule: Click to copy the schedule.
Delete this Schedule: Click to delete the schedule.